Showing posts with label Bread. Show all posts

Monday, October 10, 2011

After Turkey

Part of the reason I love making a whole turkey is the day after. I love turkey sandwiches made with the breast meat and the ease of dinners and lunches the next few days!

Tonight's dinner: Turkey sandwiches on challah bread with roasted Anaheim peppers and Pub Cheese. Plus stuffing and potato salad. Can you say starch overload? I am a carbaholoic.

"Hello. My name is Marie and I am a carbaholic."
"Hi Marie."

It's probably something that I need to work on... maybe cut back a little... a very little. I tried South Beach once. I was not a happy camper. I looked good but I wasn't nice. I could have been a professional model! OK maybe not, I wasn't that mean.

Sunday, October 9, 2011

Challah Bread and Turkey

So I started my morning baking bread and ended it with a turkey dinner. What a day! I love Sundays! Football and food!
 Apparently challah bread takes 12 hours to proof. I had no idea. I started last night at 6 putting the dough together. This beyond almost anything that I need to read the whole recipe before I start. I bloomed the yeast before I realized how long it was going to take to rise so I decided I'd let it rise over night and get up early to bake it.


 To start you'll need:
1 packet dry active yeast (2 1/4 teaspoons)
1/2 C water (105 to 115 Degrees)
3 tablespoons sugar
1 1/4 teaspoons Salt
3 tablespoons oil
2 eggs lightly beaten
2 egg yolks lightly beaten.
1/2 C all purpose flour
2 1/2 C bread flour

This is a pretty simple recipe but it's the technique that makes it difficult (it takes a long time).
Add yeast and warm water to mixing bowl and leave for 5 minutes. It should look like the picture above.
add the sugar, salt, oil, eggs, egg yolks, and all purpose flour, mix until combined. Add the bread flour slowly until it is combined.
Kneed for 8 minutes or until the dough is elastic and smooth.
Move the dough to an oiled bowl and turn once to coat. Cover lightly with plastic and let the dough rise in a warm place (75 to 80 degrees) for 1 to 1 1/2 hours, until the dough has doubled in size.
Punch down and kneed for a minute. return to the oiled bowl and place in the refrigerator for 4 to 12 hours, or until it has doubled in size.
Cut the dough into 3 or 4 pieces and  roll into balls. Allow the dough to rest for 10 minutes.
Roll into 14 inch long strands that taper at the ends.
Grease a cookie sheet and sprinkle corn meal over it.
Place all 4 strands on the greased cookie sheet with one end touching. Pinch the end together. If you are braiding 4 strands like I tried to do turn the outside ends over the middle then twist the middle strands, then repeat. It's not the prettiest loaf but it's tasty!


Take 1 egg and a pinch of salt and beat them together.

Brush the egg wash on the bread, try to get into all the nooks and crannies. This will allow for a more even browning.


<-- I swear this isn't the turkey I made for dinner.


How GOOD does that look? Even though I've eaten dinner I want to go cut off another slice of this and eat it! All it needs is a little bit of butter. The crumb is really delicate and the air pockets are really small. And the smell...Oh it was amazing! I love the smell of fresh baked bread. There's no real word to describe that smell other than happy.


AND NOW... On to dinner!


Dinner tonight was turkey (a whole frozen turkey), stuffing, and acorn squash with two different toppings.

The first squash was a little bit of vegetable oil (I used a mister) and brown sugar and cinnamon.
I baked this for about 15 minutes on one side then flipped them over and baked for another 10 minutes


The second was a little balsamic vinegar, a few tablespoons of fresh squeezed orange juice, honey, and nutmeg.I brushed this on both sides of the squash then put them on an oiled baking sheet (covered with aluminum foil for easy cleanup).

Both were baked at 350 degrees.

The turkey was a brined turkey thanks to my food muse Alton Brown.
You can find his recipe here:
Brined Turkey Recipe

It's an easy recipe that makes a very moist and juicy turkey. I am going to try other brines but there one is pretty darn good.

Happy Sunday! Don't forget it doesn't need to be a holiday to enjoy a special meal!

Saturday, October 1, 2011

10 Things Every Baker Needs

My list is in no special order; however I feel that this is a pretty comprehensive list of the basic needs of every baker. Even if you’re not using a state of the art, super high powered, “it mixes, it chops, it makes julienne fries, and it walks your dog” type counter top mixer you can make some pretty awesome baked goods with a few simples and important tools.

1. Measuring cups & spoons – liquid and dry measure are both really important. I actually have 2 sets of dry measure in my kitchen. One 18/10 stainless steel and one plastic. There’s no real rhyme or reason I have one or the other however I can use the stainless steel ones on the stove top. I use them to melt butter in small quantities when I don’t want to do it in the microwave. I also have 6 liquid measuring cups. Why? Because I can. They’re all different sizes, from 1 cup to 4 cups, 3 plastic and 3 glass. I actually find myself using the glass more often, no real reason except that they’re in the drawer with the prep bowls.

This may go without saying, but the spoon you use to eat your cereal is not a measuring spoon. Although we call it a “tea spoon” it is really not a teaspoon measure sadly. You need actual measuring spoons, they’re not particularly expensive. If you buy mental go for a heavy 18/10 stainless steel, the steel content will be marked somewhere on the spoons. You want a heavier spoon so you don’t bend it out of shape when you’re trying to scoop out particularly hard baking soda. 

2. A butter knife – this goes with the measuring cups. When you’re making cookies or bread or anything else that you’re using a dry measuring cup for you should always run the straight side of a butter knife over the top to clear the excess off the top to get the exact right measure.  

3. 2 Heavy jelly roll pans/cookie sheets – I use cookie sheets for all kinds of things, to bake cookies (obviously), to catch the drippings from a casserole or pie, to bake loaves of round bread, or to lay out gnocchi to freeze it. 

4. 2 round cake pans 8 or 9 inch – not just for cake anymore! I used mine for cinnamon rolls and for a custard water bath. Even with all these uses however; you really never know when you’re going to be called upon to bake a great cake and a good standard is to have round pans. It’s the most common household birthday cake shape; unless you have 30 people in your household, then you need a sheet cake every time.

5. Pie pans (at least 1 if not 2, I think I have 4)– I personally love my clear Pyrex pie pans. They take the heat really well and they look nice on the table. You can also use them to my layered dips, I think it’s nice when you can actually see the layers so you have some idea what you’re about to get on your chip!

6. A timer – I know this should already be in your kitchen if you’ve read my “10things every kitchen needs” but I say it again for anyone who might have missed it! (but how could you have?) You need a timer. I know most baked goods say “X time to Y time, or until golden brown” so some other description, but what if you’re watching TV? Or got lost in a book and forgot to check on your muffins? Then all your hard work would be for naught. You’d have to throw them away, and you’d be pissed, or at least I would be. There should be at least 1 timer in your kitchen, on your microwave. But you’ll need more than that. I personally like multi timers, I have a quad timer, so I can have 3 or 4 things going at once and know how long everything had left! It’s great! 

7. 2 Good loaf pans – almost every bread recipe makes 2 loaves of bread, so if you’re going to buy one you might as well buy 2 so you’re not stuck with ½ a batch of bread dough that you can’t bake because you didn’t get an extra loaf pan. I’m currently using Calphalon non stick loaf pans. I don’t think they need to be non stick because I always grease the pan with Crisco anyway but it’s a nice added feature.

8. Pizza stone – because I’ve lived in an apartment for so long I’ve never had a new oven so I’ve always kept a pizza stone in my oven. It never comes out. Leave in on the floor of the oven in an attempt to keep the oven temperature fairly stable. Now that I have a gas stove again I’m feeling a little more confident about the stability of the oven temp but it’s still nice to have in there. I’ve never used mine to actually cook pizza, just to regulate temps! 

9. Whisk – I know almost everyone beats their eggs with a fork but it’s nice to have a dedicated tool for the job right? Plus if you need to beat to a foam or a meringue you already have the tool on hand. If you’re making a meringue I’d suggest an electric hand mixer, it’ll make the job much easier, but if you don’t have/don’t want/or can’t afford an electric hand mixer you certainly can do it by hand, I know the Amish can do it so why can’t we?  

10. Lots of prep bowls – I use bowls of all different sizes when I’m baking. I try to measure out all my ingredients before I start so I know I have enough of everything and I’m prepared when it’s time to start adding the ingredients to the work bowl. Some things need to be added in a certain order or at a certain time so it’s nice to have everything laid out and ready. Often I find myself using almost every bowl in the kitchen!

I don’t think I’ve missed any of the truly important basics. If I have let me know in comments!! Of course from here you can go all different routes with bunt pans, popover tins, muffin pans, and all different shapes and sizes of cake pan but this list is what I classify as the basics.

Now that you have all the tools to bake I have one thing to say in the words of a wise man who loved food:

“GET IN THE KITCHEN AND MAKE ME SOME PIE” – Cartman, South Park

Tuesday, September 27, 2011

Success - Part II Sunday!

Raisin bread, white bread, and lasagna!

After such a full Saturday you'd think I'd want to take Sunday off right? Oh no my friends. I put the goal out there for all of you to read... I wasn't going to disappoint. I certainly learned why bakers start really early in the morning. I started early, or so I thought. I woke up at 8 AM. I started work about 9 AM. I didn't finish the bread until almost 2. But it was oh so worth it. And really it wasn't much work, it's just a lot of waiting. it took about 1/2 hour to make each loaf but almost 3 hours for each to rise and be ready for the oven then 40 minutes to bake. So for the most part I was sitting waiting (well not really I was busy with the lasagna but I'll get to that later).

I have pictures, sadly not of the process of making the bread. That would have taken a little forethought and maybe an extra set of hands, which I gained later in the day for pictures of the lasagna. I think 9 AM was a little too early to ask my husband to get up just to take some stinkin' pictures of me making bread. :)

I chose to make what's called Milk Bread. I thought it sounded un-appetizing until I realized I could also make Cinnamon Raisin Loaf with the same dough. With the recipe chosen I was off!

1 package (2 1/4 teaspoons) active dry yeast
3 tablespoons warm water (105 -115 degrees)
1 C milk (the fat content does not matter, I used 1%) - warmed to 105 to 115 degrees
5 tablespoons melted butter or margarine (I used butter)
3 tablespoons sugar
1 large egg
1 teaspoon salt
2 cups of bread flour
1 1/2 to 2 C all purpose flour
melted butter (some)

Step one: yeast plus water. It sounds really easy but this is where you will make or break your bread. If you heat the water too high (above 115 degrees) you will kill the yeast and your bread will not rise. If you don't heat it enough you will not wake your yeast up and it will not rise. I started with a pot of water on the stove and heated it slowly while getting all the other ingredients out. add 3 tablespoons warm water to the mixing bowl of your electric mixer plus the yeast. Let this rest for 5 minutes. It should dissolve and get bubbly. You may even hear the air bubbles popping.

Step two: Add the warm milk, butter sugar egg and salt. Mix for about a minute.

Step three: Flour. Add the bread flour and mix until combined. This will be very wet. Once this is combined add the all purpose flour 1/2 cup at a time until it is no longer sticky. To this novice, it still seemed sticky even when I had added 2 cups of flour but I decided to just go with it and see what happened. It worked out so I guess I need to change my definition of what is "sticky".

Step four: Knead! This is the fun part! If you want to knead by hand pull the bowl and kneed by pushing the roll of dough away from yourself and folding in half, then turn 45 degrees and push away again. If you don't want to do it by hand you can knead with a dough hook in your electric mixer, that's what I did. Knead for 10 minutes.

Step five: Leave it alone! Ok that's not true, you need to put the dough in a oiled bowl and turn once to coat. I put the oil in the bowl by first coating part of a paper towel and wiping down the inside of the bowl. Cover the dough with plastic wrap and leave it in a warm place (75 to 80 degrees) for 1 to 1 1/2 hours. I put the bowl in my oven with a bowl of steaming hot water to warm up the oven a few degrees.

Step six: Punch down the risen dough and knead for a minute.

Step seven: Refrigerate for 1/2 hour. I'm really not sure why, but I did what it told me to. The yeast was still hard at work and the dough rose a little more in the refrigerator.

Step eight: Rise again. Put the dough in a greased 8.5 X 4.5 inch loaf pan. You should try to shape it into a loaf type shape before putting it in the pan. If it starts in a ball either pull and fold it until it's in the right shape or roll it out with a rolling pin so it is 8.5 X 18 inches (or so), this is when you would add 2 tsp cinnamon, 2 tbs sugar and 1/2 C raisins to make cinnamon raisin loaf. when you've added the filling roll the loaf into an 8.5 inch roll and pinch the ends and place in a greased loaf pan. Cover the loaf with plastic wrap again and allow to rise for 1 hour.

Step nine: Bake at 375 for 40 minutes. Before you place the loaf in the oven brush with melted butter, or if you're making raisin loaf sprinkle cinnamon and sugar over the top. You'll know your loaf is done when you tap the bottom and it sounds hollow. I found this really hard to do when the loaf and the pan were still really hot but I somehow found a way. I put the loaf pan on the edge of my range top and held the other end while leaving the center open for tapping with my oven mitt covered hand.

I'm not going to lie I was shocked this turned out right. Having never made bread before I was really expecting something flat and very sad looking. And now that I've read the recipe I realized I made a mistake. I used all bread flour. My bread is very chewy, which I think is really good but I can see it might be too much for some people. You may not be able to see it in the pictures but the process of kneading and rising and refrigeration created very small air pockets, as opposed to some bread which has very large air pockets.

Lasagna!

I've made this lasagna and I figure it's about time I share it with the world, especially since I think I perfected it.

Layers:
1 bunch swiss chard (I used red swiss chard, it has a red stem instead of green)
4 tablespoons olive oil
1 1/3 C chopped onion
4 cloves garlic chopped
1/4 teaspoon crushed red pepper
pinch of salt
1 lb mushrooms sliced
1/3 teaspoon ground nutmeg

Sauce:
2 1/2 C whole milk
1 bay leaf
6 tablespoons unsalted butter
1/4 C flour
1/2 teaspoon coarse salt
pinch cloves

Lasagna
9 lasagna noodles
olive oil
15 oz ricotta cheese
6 oz fontina cheese coarsley chopped/grated (I chopped)
8 Tablespoons grated parmesan cheese

I started by making the layers, then the sauce then cooking the noodles. The recipe said to make the sauce first but that seemed odd because it would just be sitting around while you made the rest and I'm sure I'd do one of two things; either I'd knock it over and spill it everywhere and need to make it again, or it would overheat and curdle and that's just gross.

To start: Set a pot of water boiling with a pinch of salt. Remove the center veins of the swiss chard leaves, clean and coarsely chop. Boil the leaves for 1 minute. Remove from the water and drain of as much water as you can, set aside.

Set another pot of water to boil, this is for the lasagna noodles.

Add 2 tablespoons of oil to a saute pan and heat. Add the onion, half the garlic and the red pepper to the pan. Allow this to cook until the onions begin to soften and turn transparent. Now the chard should be a little cooler, press as much of the water out of the leaves as possible. Once they are as dry as you can make them add the swiss chard to the onions and garlic and mix. Add salt and pepper to taste. Remove from the pan.

Add 2 tablespoons of oil to the same pan with the mushrooms and the rest of the garlic. Saute until the mushrooms start to turn brown and become fragrant. Add nutmeg, salt and pepper. Remove from the heat.

In a heavy sauce pan heat the milk and bay leaf to a simmer. In another pan melt the butter. Add the flour to the butter pan and whisk continuously for 2 minutes. Slowly mix the milk and bay into the butter/flour roux. Add salt, nutmeg, and cloves. Continue to summer until the sauce has thickened to the point that it coats the back of a spoon. This should take about 3 minutes.

Once the water boils for the lasagna noodles add all nine to the pot. Mix every few minutes. These should take about 9 to 10 minutes. These will be a little more firm that you would normally cook pasta, don't forget they will be cooking more in the oven.

Lay out the cooked lasagna noodles on a baking sheet or wax paper.

Prepare a 9X13 inch baking pan (I love my Pyrex) by oiling the insides.

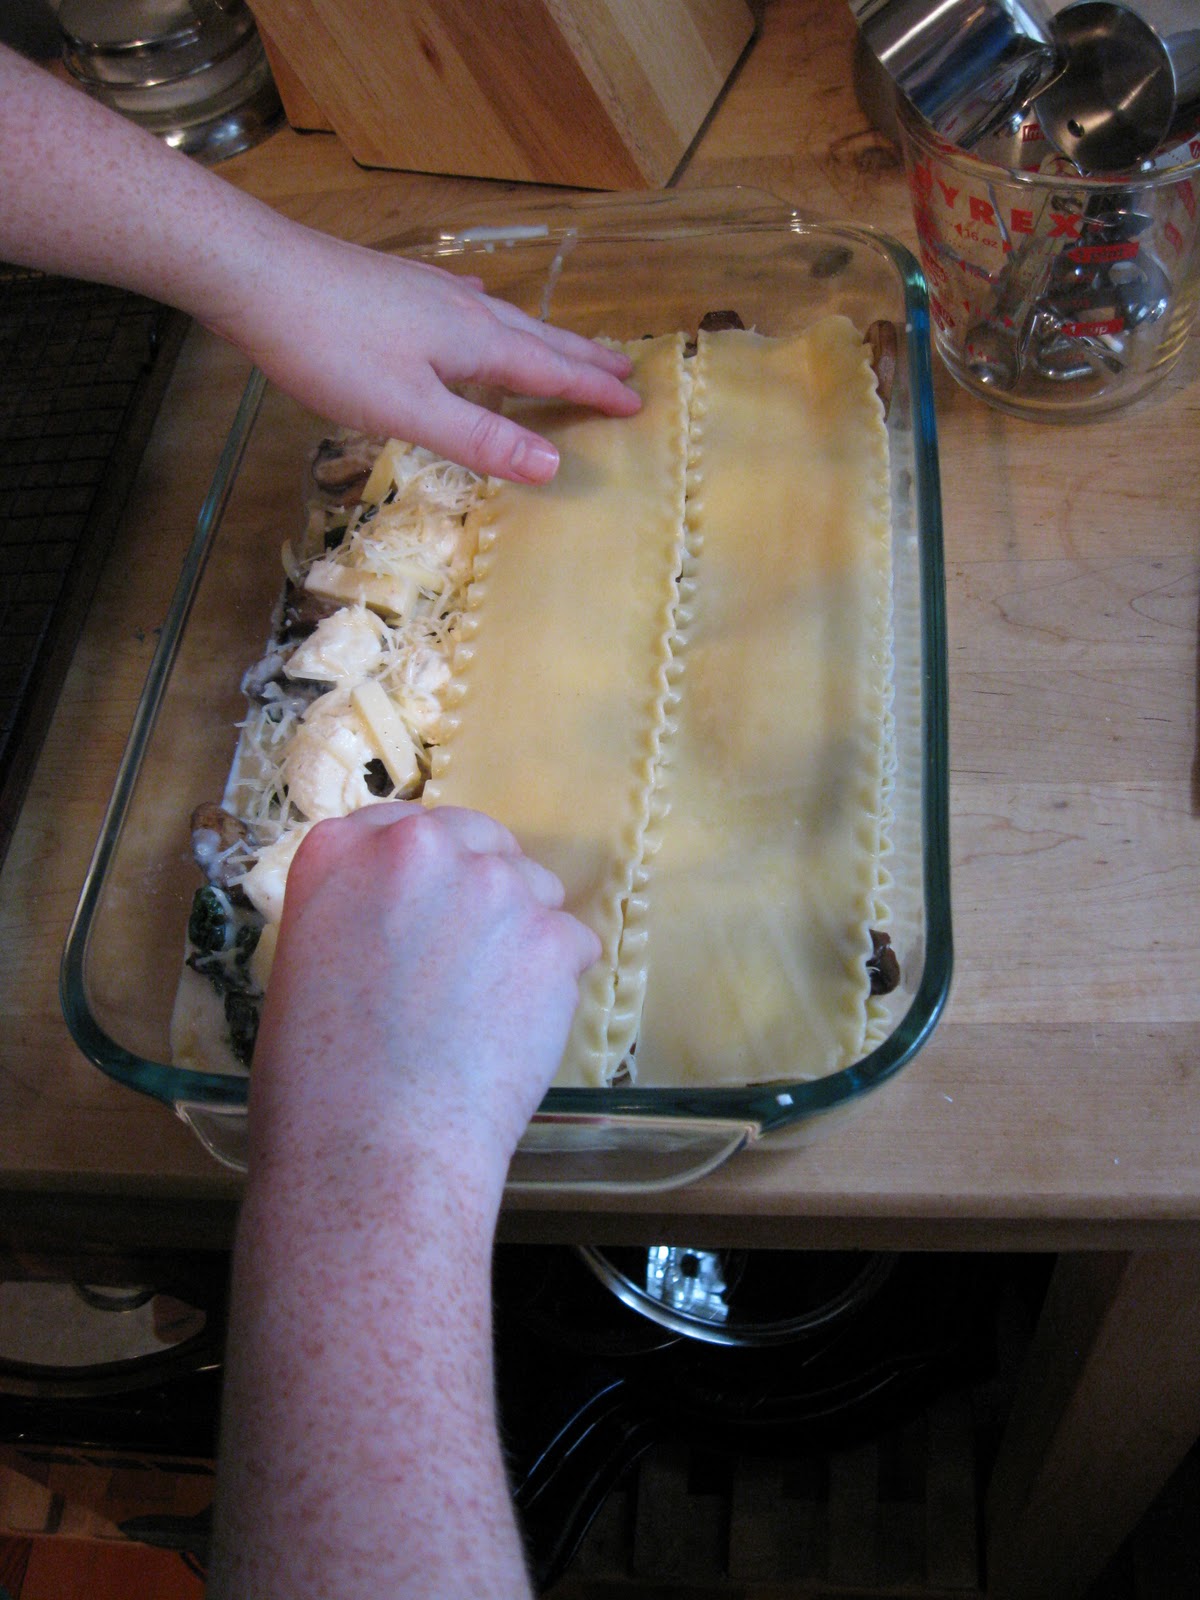
To build the lasagna add a few tablespoons of the sauce to the bottom of the pan, lay out 3 lasagna noodles side by side. Add 1/2 the chard mix and 1/2 the mushroom mix in as flat a layer as you can. Add 1/2 the ricotta, fontina, and parmesan. Pour 3/4 C sauce over the whole lasagna. Repeat for the 2nd layer. Lay the remaining 3 lasagna noodles on top, pour the rest of the sauce over top. I also added a thin layer of parmesan just for a little extra cheese.

Bake covered at 400 degrees for 30 minutes, remove the cover and bake for 20 to 30 minutes, until golden brown.

The swiss chard is a little bit bitter which mixes really well with the sweet of the ricotta, the buttery flavor of the fontina, and the salty parmesan. It is a nicely balanced flavor.

I made this Sunday and I initially intended not to cook it on Sunday, just assemble the parts, but I was concerned it would become soggy and soft overnight. I decided to bake it on Sunday and reheat on Monday. Having done it I think it was the right choice, the lasagna was solid without being soggy or falling apart.
 
It was a really busy weekend but it was absolutely worth it and I plan on doing it again! Making at least 1 or 2 dinners ahead has allowed me to have more relaxing evenings after work and the bread makes great breakfast!

That's all I have for now my friends. Comments and questions are always appreciated!